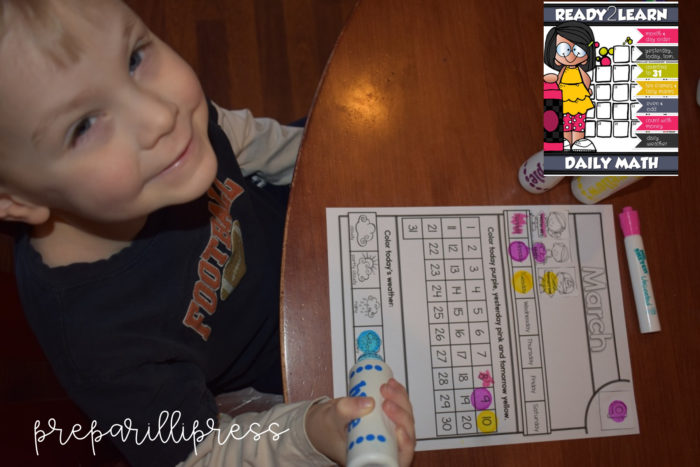
How are you integrating the calendar into your little one’s daily math? My little guy loves our Daily Calendar Math for Pre-K!
It is divided thematically into eleven months (August-June). Each month has seven sheets that can be rotated throughout the month. Because your students will be using the date to accomplish the counting problems, you can use each sheet multiple times!
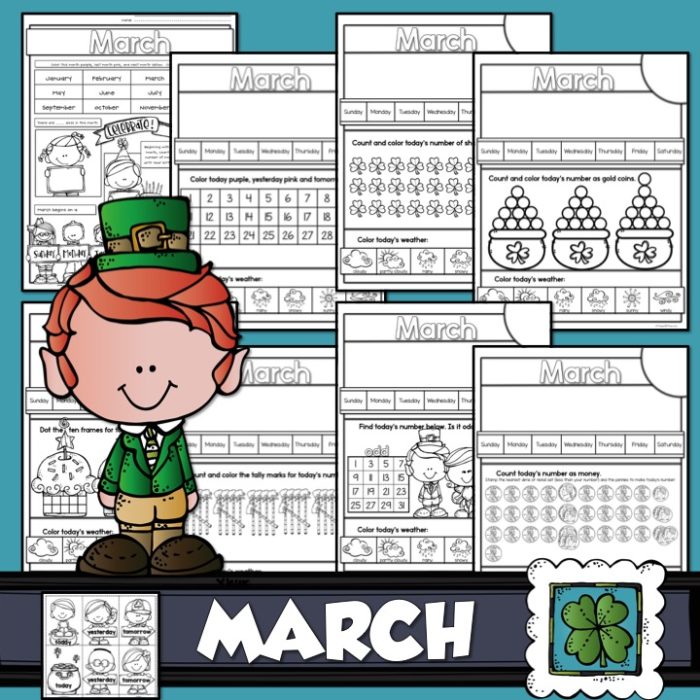
Here’s a peek at all the fun learning in store for March:
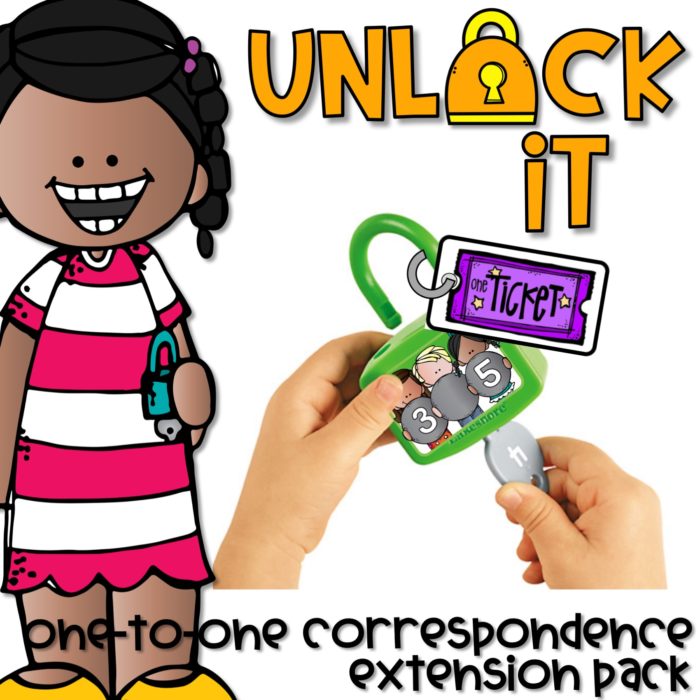
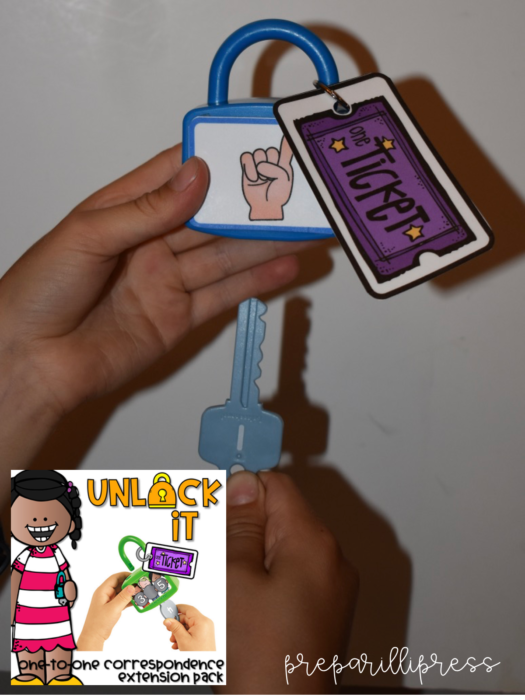
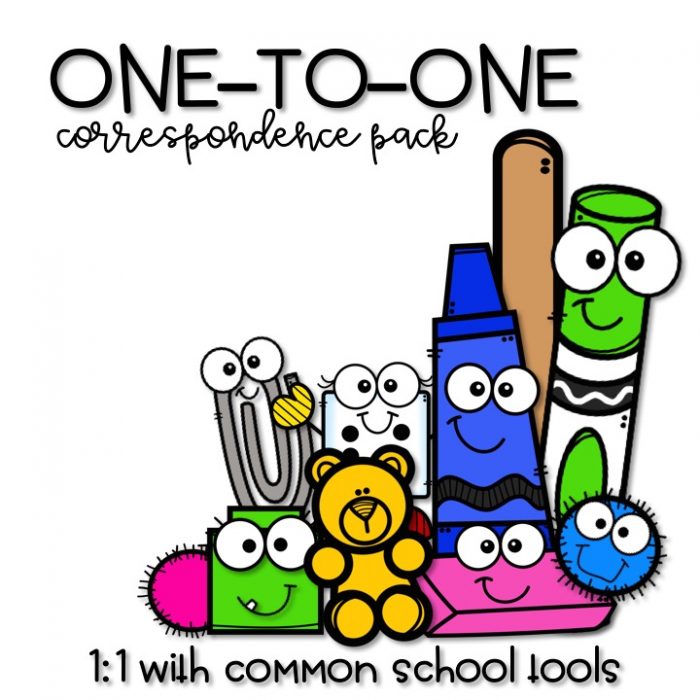
If you are like me, you love Lakeshore Learning–especially when they have a sale! Last year, I grabbed my first UNLOCK IT set (Matching Numbers). It was fun…for a couple days. I found myself wishing it had more options; more ways to develop 1:1 correspondence.
Instead of just wishing, I created this expansion pack:
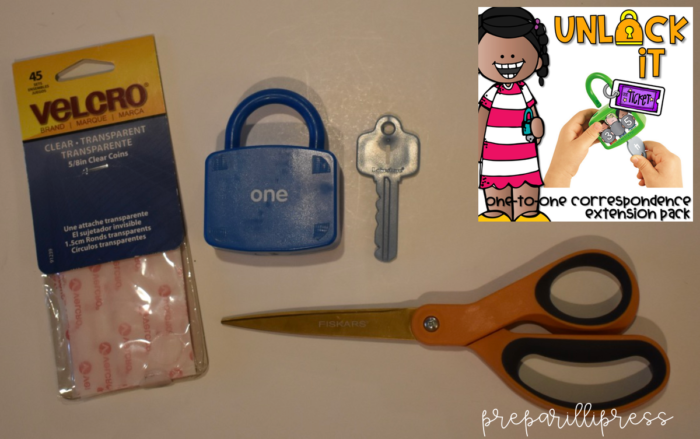
All you need is a little clear Velcro (just one dot per side of the lock). Cut it into quarters and place it in the corners of the lock. Do the same with the fuzzy Velcro on the backs of the 1:1 images.
Add a ticket for a bit of extra fun! Your students will work to make the most matches.
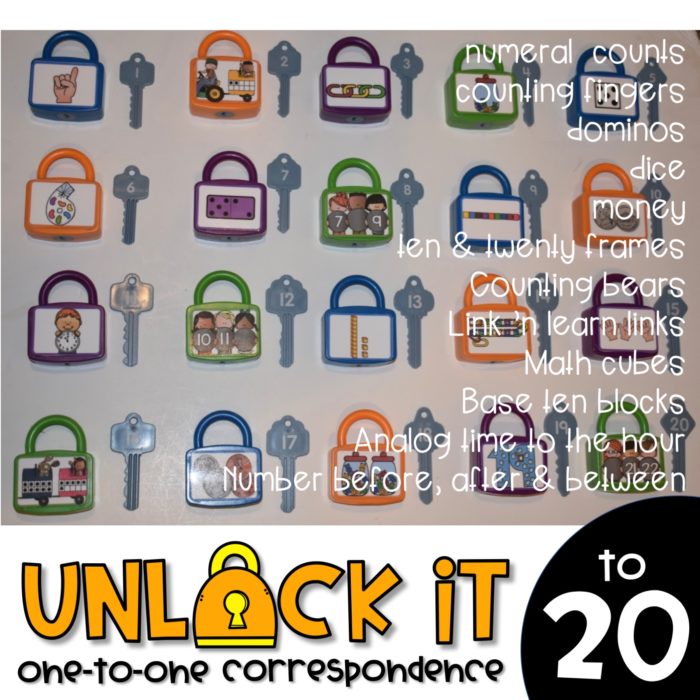
This expansion pack includes a bunch of 1:1 correspondence that you can use any day of year. Each set has images for 1 to 20, except the analog hours and dominoes.
When it comes to teaching our youngest students numbers we often focus on counting. Counting involves memorizing the number words in the proper order (one, two, three, four, five…). Many young children easily memorize the number words in their proper order, but often do not understand the concept of one-to-one correspondence.
ONE-TO-ONE CORRESPONDENCE is being able to skillfully count an actual number of objects. A child that understands one-to-one correspondence knows that 2 cookies = 2 or that 5 raisins = 5. Our students need many opportunities to practice saying one number with one object.
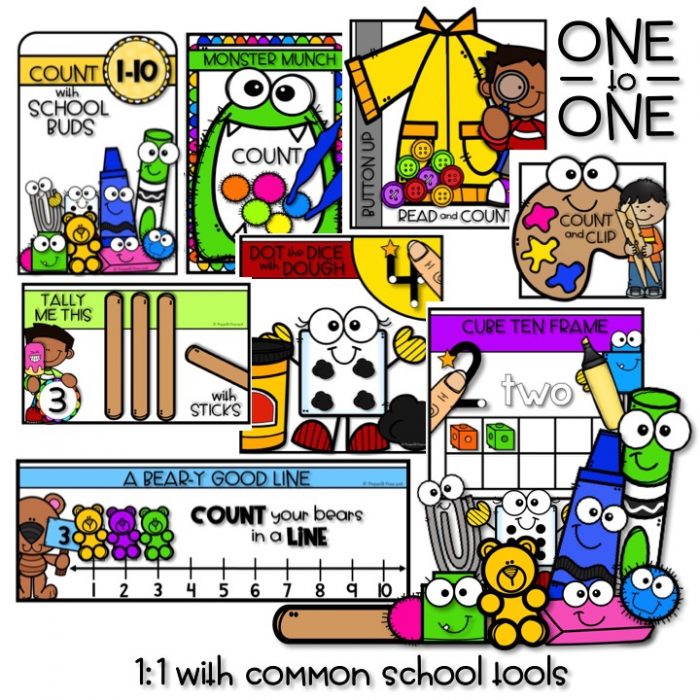
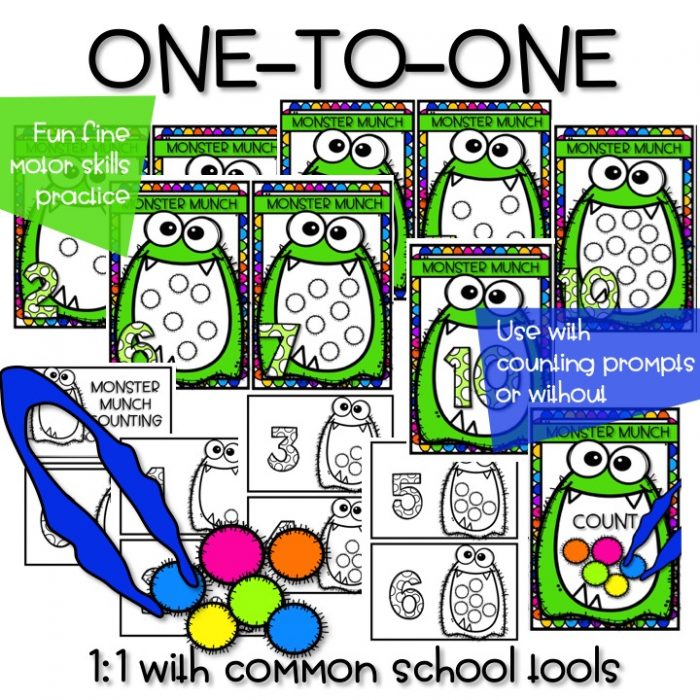
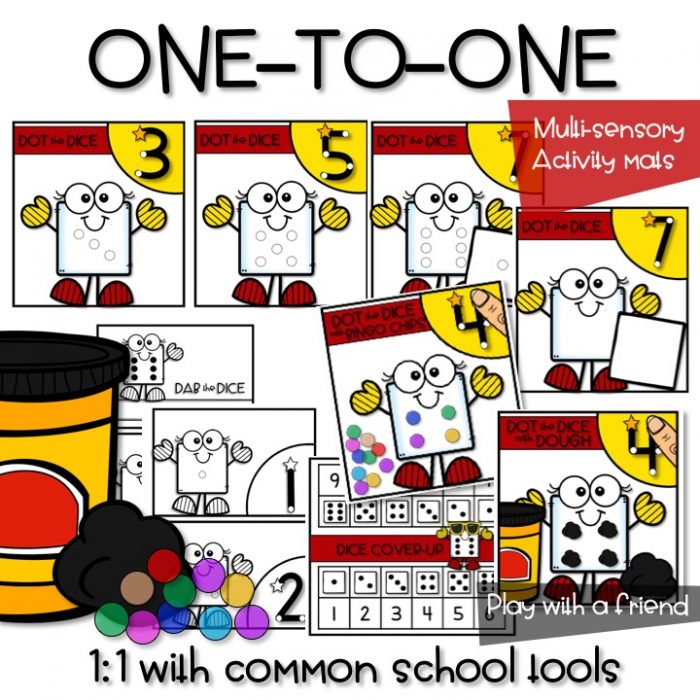
Here is GREAT way to begin next school year with 1:1 correspondence:This 220-page ONE-TO-ONE CORRESPONDENCE ACTIVITY PACK can be used with tools already in your classroom to build 1:1 correspondence in your students!All of the activities in this pack include mats and booklets WITH prompts, for your newest number learners or students that need additional practice, and WITHOUT prompts (so you can assess your students’ learning).
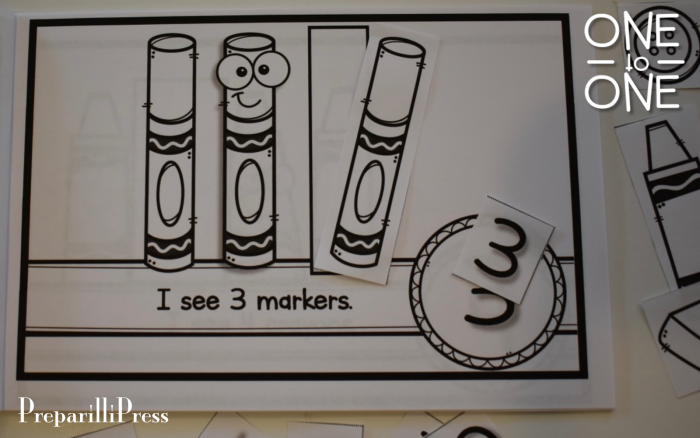
In this first activity, your students will count with Play-Doh containers, erasers, markers, crayons, counting bears, dice, math cubes, pom-poms, buttons and paperclips. The School Buds 1-10 booklet includes numbers and shapes to glue on the pages–matching the number and completing the count.
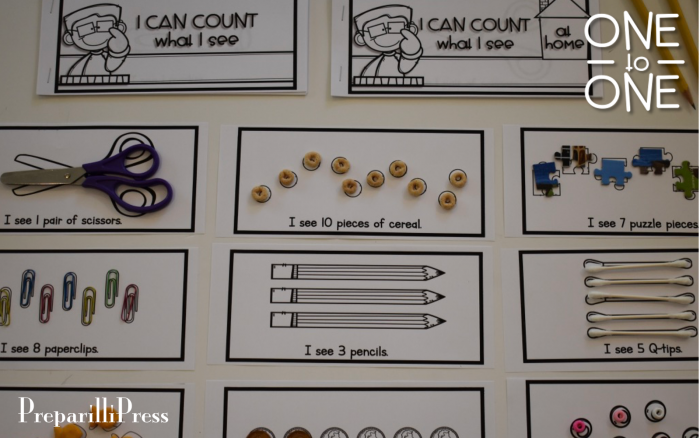
The “I Can Count What I See” sheets can be used as additional task cards, or stapled together into booklets. They use some of the same manipulatives as the previous set, or ones that your students can find at home (scissors, Q-tips, elbow macaroni, Cheerios, Goldfish and small puzzle pieces).
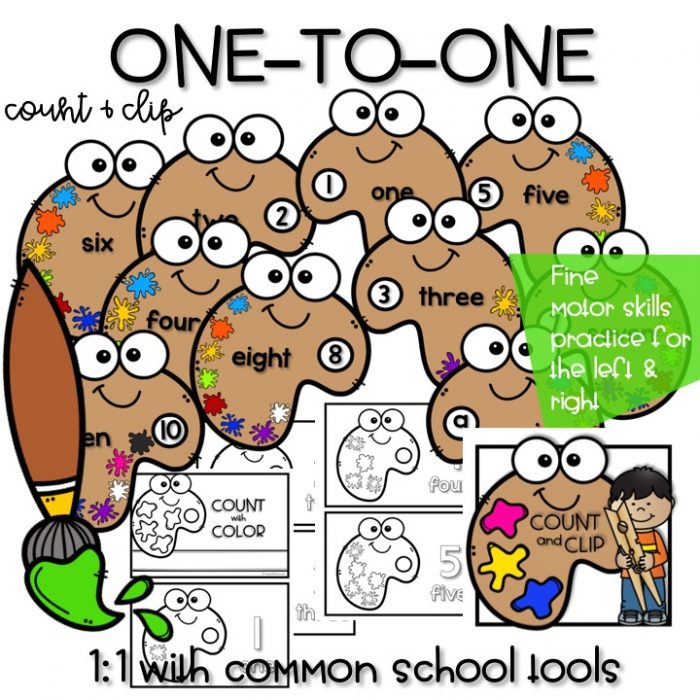
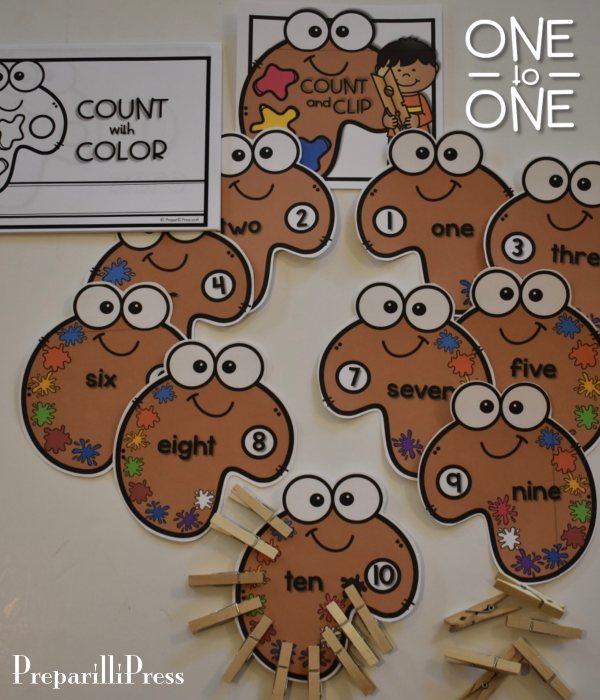
Another fun way to count (and great for fine motor skills) is to clip what you count. With these color palettes, your students will be challenged to use the clips with both of their hands.
The Count and Color booklet, like all of the other ones you will see in this post, can be completed with dot markers and crayons. Or you can use these sheets as additional task cards and your students can count with Play-Doh, clothespins, push pins, hole punchers, moon sand, regular sand, finger paint or even edible counters (yum!). The possibilities are endless! The more your students practice, the better they will get at 1:1, number recognition, and counting.
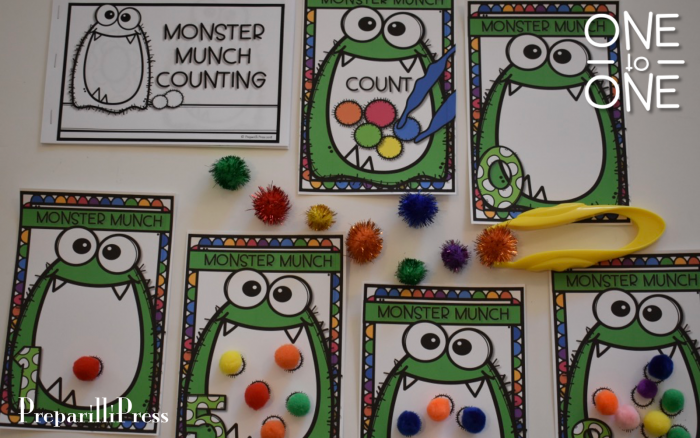
Here is another great way to incorporate fine motor skills into your 1:1 correspondence lesson–plastic tweezers!
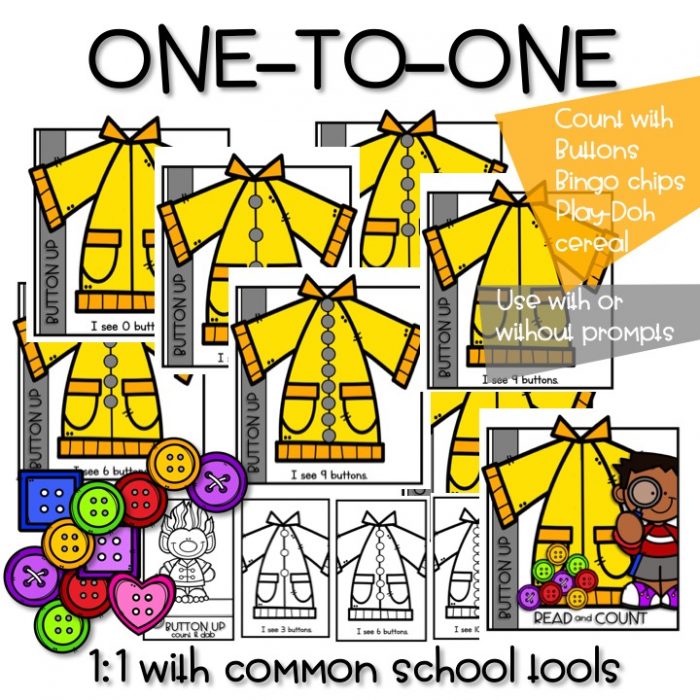
And, I love this Button Up activity. You don’t just have to use buttons, either!
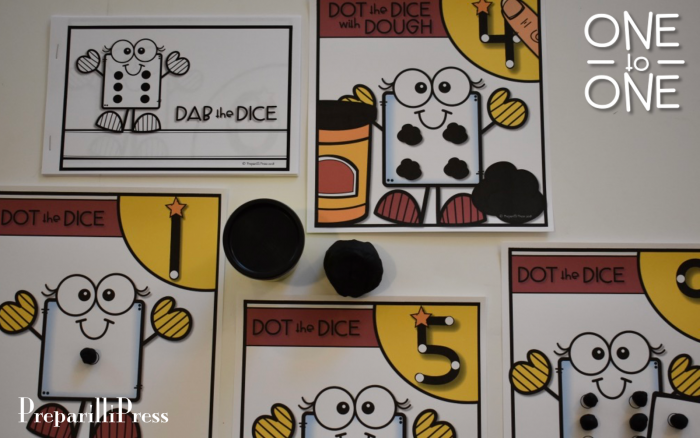
These multi-sensory mats are great for instructing correct number formation along with the 1:1 relationship. And, what child doesn’t love Play-Doh? (If you have one, just use bingo chips :)!
To form the numbers, have your students place their pointer finger on the star and talk them through the number formation. For the Number 4 I would say, “Start at the top on the star. Short line down. Stop. Straight line over. Stop. Now jump up and make a big, straight line down. Stop.”
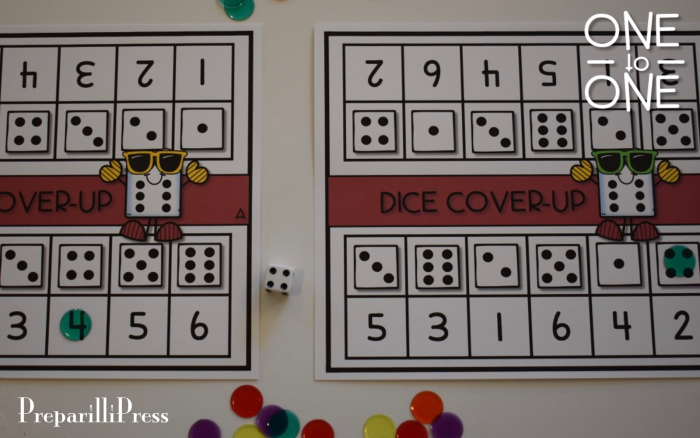
With a die and a partner, your students can play DICE COVER-UP. They will roll the die and cover the die face they rolled, or its number. First one to cover all of the spots on their game board wins! Two boards are included–one that is in numeric order, and one that is not.
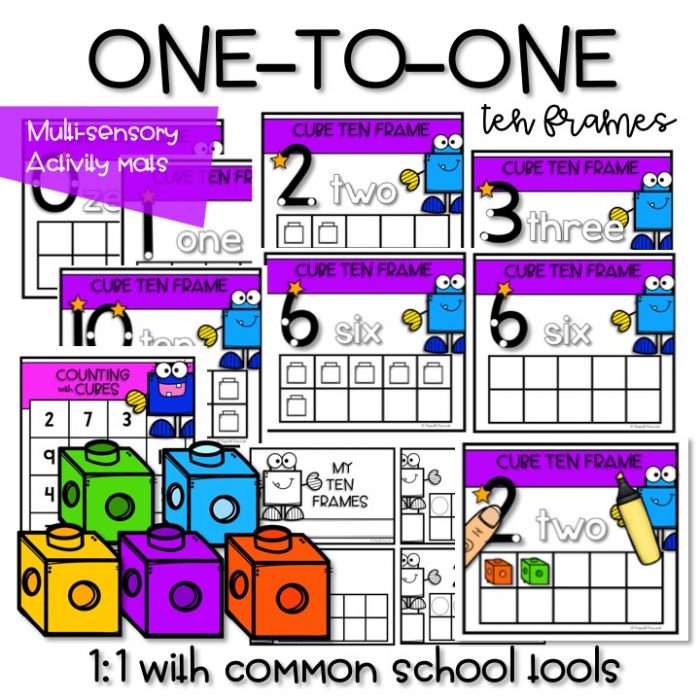
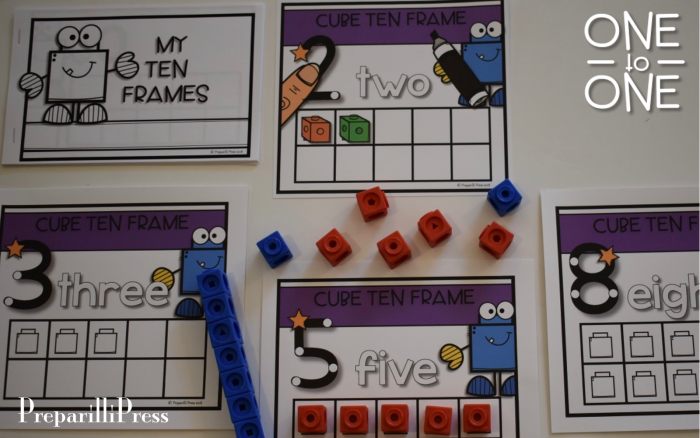
With this multi-sensory activity, your students can build ten-frames, practice correct number formation and “write” the number word.
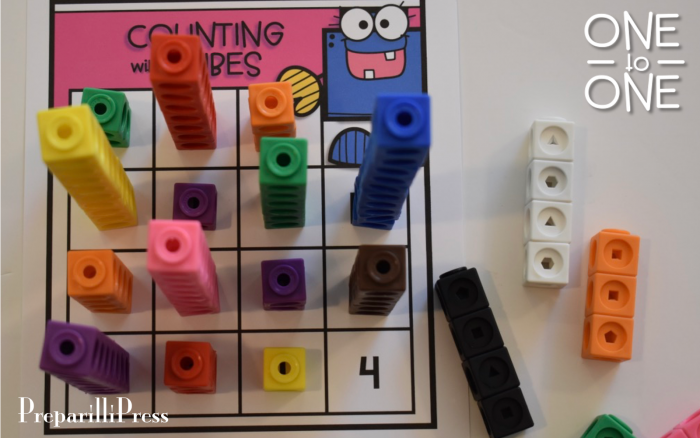
Count and stack the math cubes on the Counting with Cubes mat.
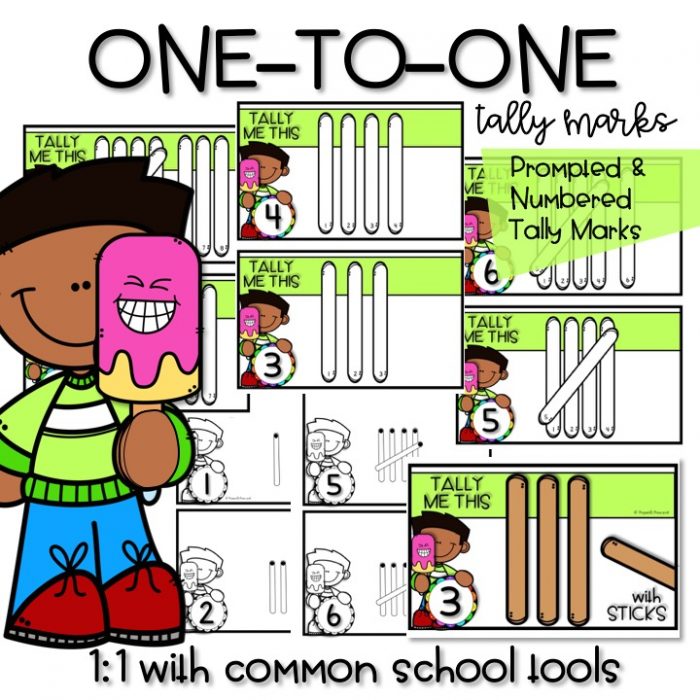
Teach tally marks with Popsicle sticks. The prompts on the Tally Me This mats are numbered to help your students learn to tally from left to write and slash for 5. Finally, teach 1:1 correspondence using a Bear-y Good Line (and counting bears).
You’ve gotta get this set! Your students are going to LOVE math. So, go grab it for 1/2 off today (here)!
Letter Z has been added to this amazing set of interactive phonics activities, so this baby is complete! Yay! Grab it at half-off today!
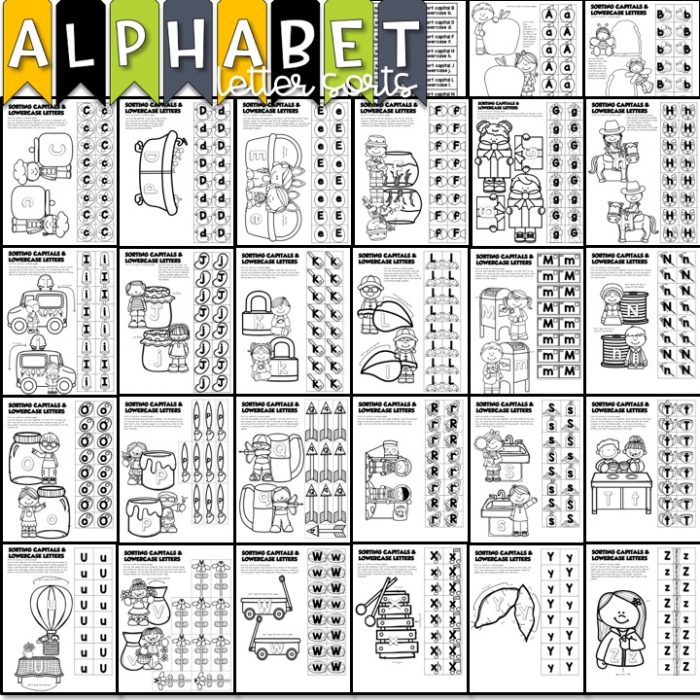
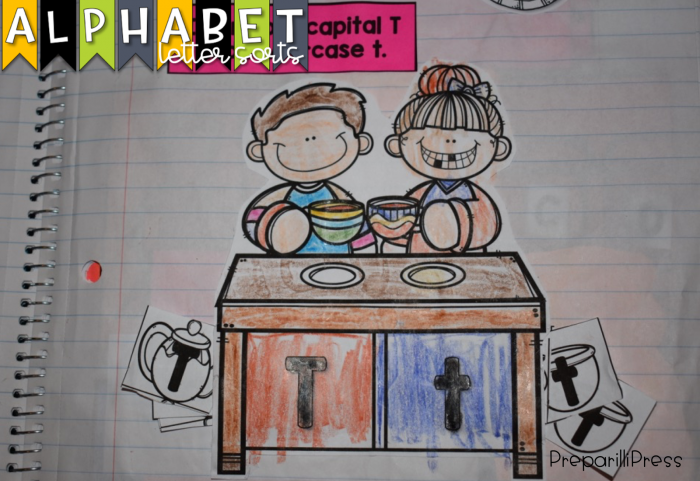
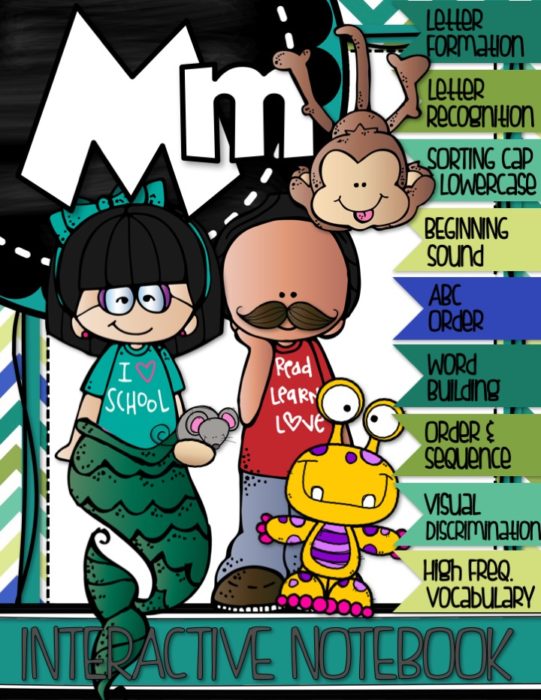
For each letter your students will complete hands-on activities for: – Correct letter formation (uppercase and lowercase writing)
– Letter recognition
– Sorting lowercase and uppercase
– Beginning sounds (including long and short sounds for each vowel as well as hard and soft sounds for C and G).
– Using high frequency vocabulary that begins with the target letter
– ABC order up to the target letter (this set can be purchased separately here)
– Word building with lowercase and uppercase letter matching
– Order and sequence
– Visual discrimination (identifying items that begin with the correct sound; are found in a particular place; are a particular size or shape; or simply do not belong).
– Using stickers to accomplish simple beginning target letter sound tasks
Are you ready for some awesome interactive learning? Check out the tutorial to see how we put our notebook together and be sure to grab your copy of Letter M.
We are kicking off our school year today with a FLASH FREEBIE for you! If you are teaching Pre-Schoolers or Kindergarteners, you are going to LOVE these fun, self-exploration crafts.
We will be using the “This is Me” and “My Name Begins With” on the first two pages of our Kindergarten LA notebooks. Our Kindergarten Math notebook will begin with “My Birthday is On”, “My Hand” and “Is My Foot a Foot.”
If you want to use the pages in your Interactive Notebooks, like we are doing, just scale them to 85% , trim the excess white space and glue ’em in :).
It will be free for the next 6 hours and then half-off the rest of the day!
The growing bundle is here! It includes all of the letters completed (A to X) and an editable cover page for your interactive notebooks. Letters Y and Z will be added in September.
If you haven’t downloaded your free sample {Letter M}, you can get it here. There is also a tutorial that will help you put it all together.
You are going to love the strong phonics foundation that MY FIRST A to Z INTERACTIVE NOTEBOOK helps you provide your students. Your students will not only enjoy building each page and making it “theirs” by adding color and their creativity, but they will also love going back and reviewing their completed pages and therefore reinforcing what they have learned.
Interactive notebooks help you cut the clutter in your classroom. When your students practice and reflect on phonics and the alphabet in one location, it allows them to be organized. You won’t lose or misplace their work, and they will benefit from the chance to reflect (and interact with) all they learn.
This bundle will be listed at half-off through Wednesday!
Actually, we ended up with 3 notebooks filled with A to Z work! They are going to be such a GREAT starting point for kindergarten. I know you will love using them with your students!
For each letter your students will practice:
Correct letter formation (uppercase and lowercase writing)
Letter recognition
Sorting lowercase and uppercase
Beginning sounds (including long and short sounds for each vowel as well as hard and soft sounds for C and G).
Using high frequency vocabulary that begins with the target letter
ABC order up to the target letter
Word building with lowercase and uppercase letter matching
Order and sequence
Visual discrimination (identifying items that begin with the correct sound; are found in a particular place; are a particular size or shape; or simply do not belong).
Using stickers to accomplish simple beginning target letter sound tasks
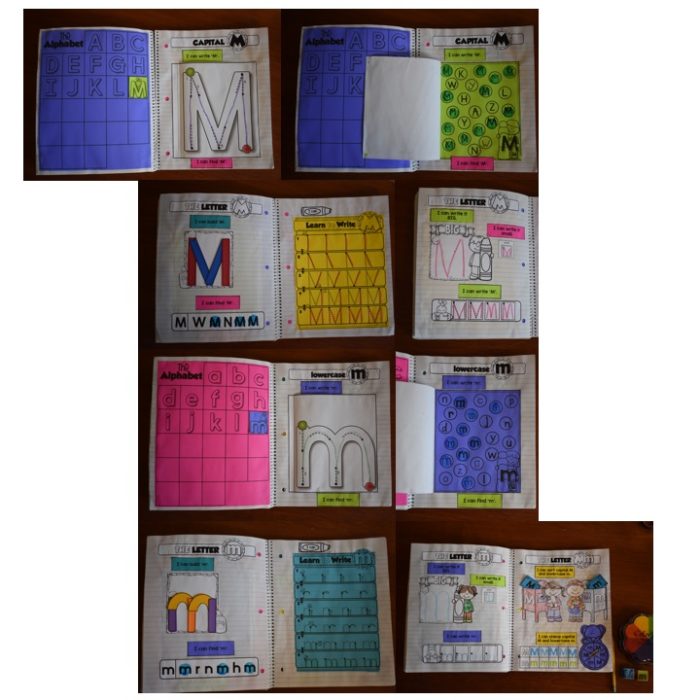
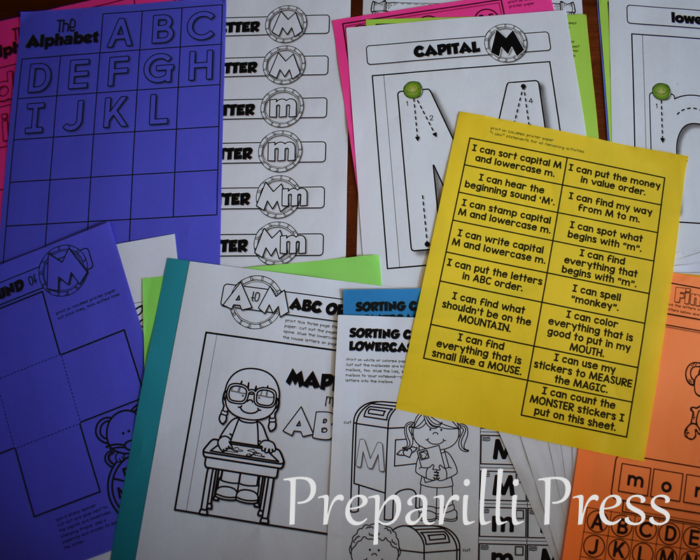
Here is how we put our notebook together. We’ll use the printables for Letter M (download a free copy of these printables here).
Every pack is formatted similarly to Letter M. Certain pages work best on plain paper, and others on colored. I have noted our preferences on each sheet, but you are welcome to use colored paper, or not.
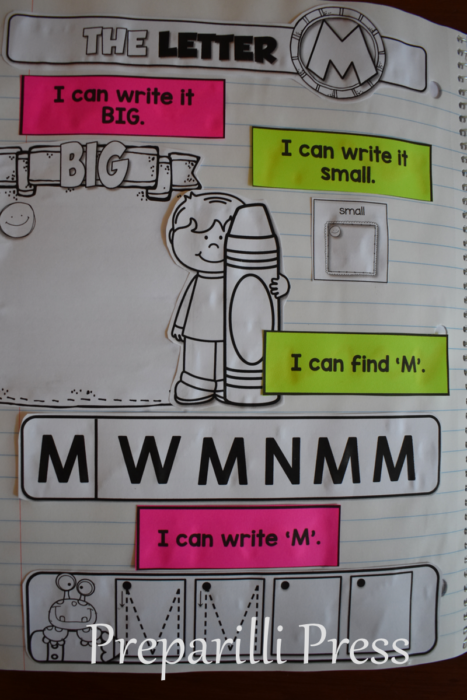
CAPITAL M: After printing this section, pages 2-3, 5-8 (including the Letter M Headers and TOC) cut out each part:
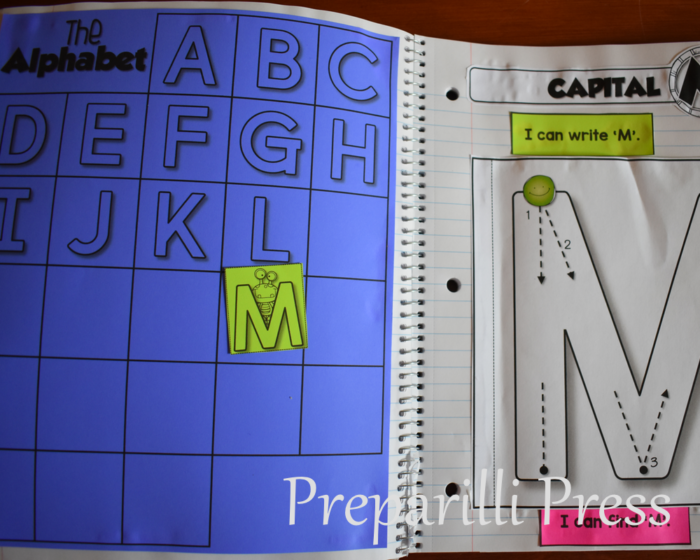
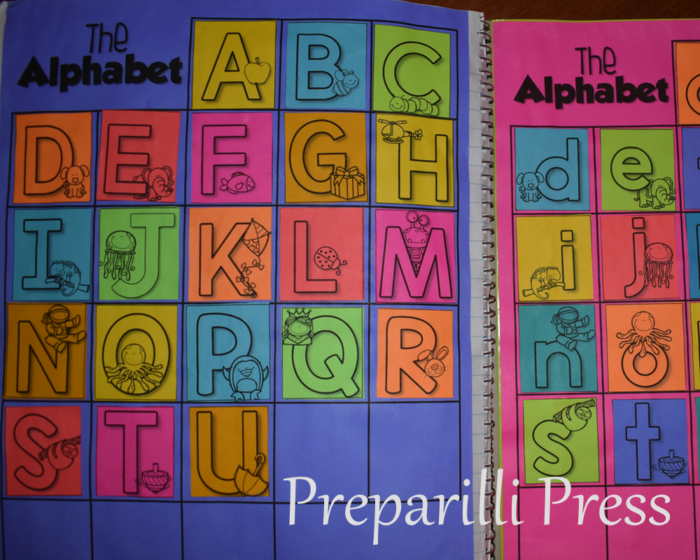
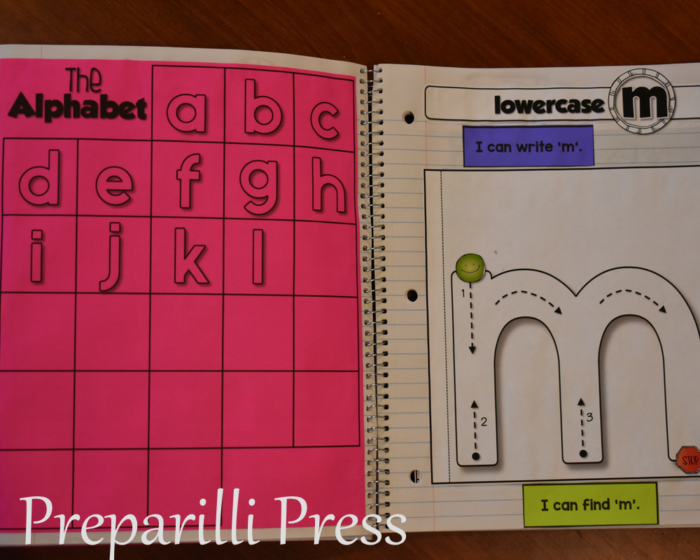
SHEET 1: If you plan on using only the Letter M pack, the capital letter Alphabet Poster will be the first page in your notebook. Trim the edges to fit, and glue the outside edge of this sheet to your notebook.
If you plan on completing all 26 weeks, glue both blank Alphabet Posters (from the Letter A pack) inside the back cover of the first notebook and refer back to it each week you add a new letter.
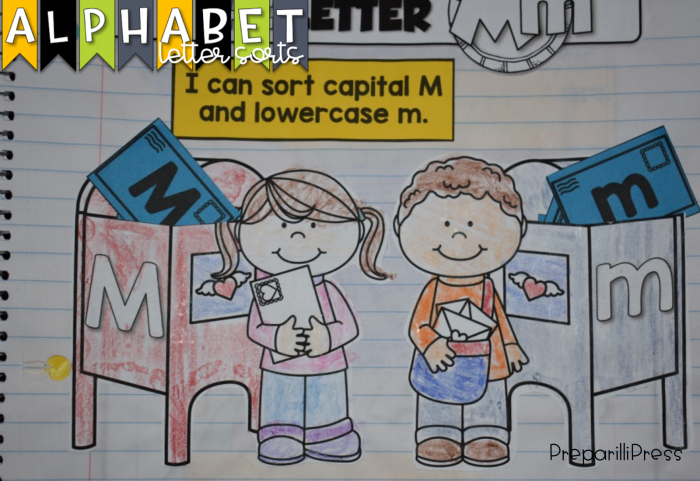
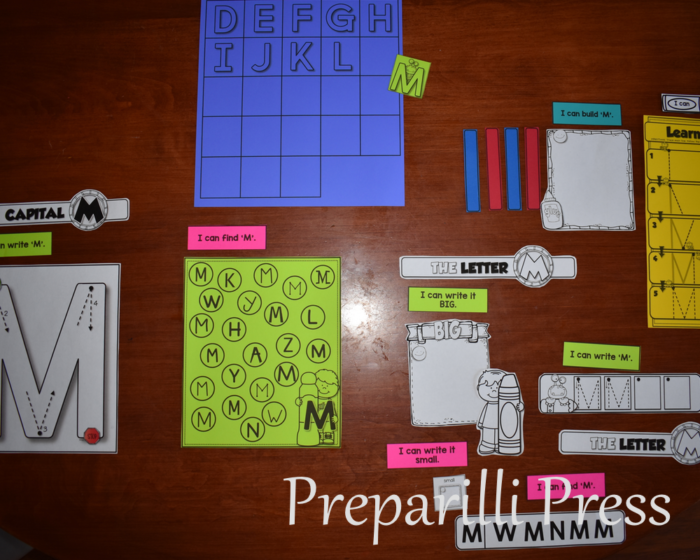
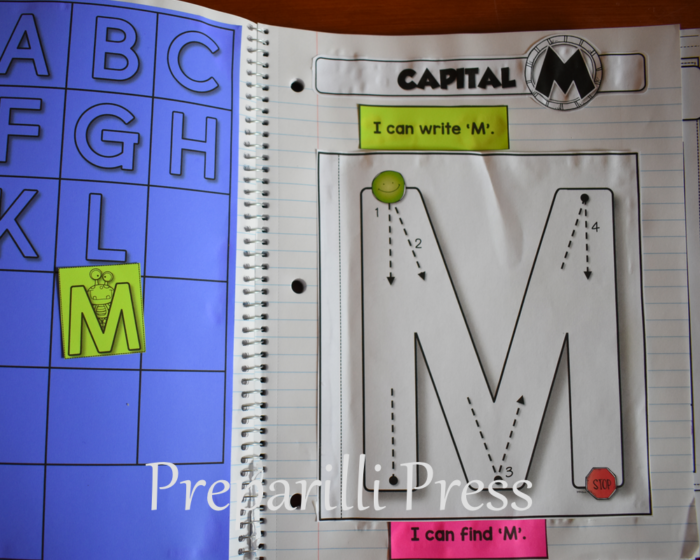
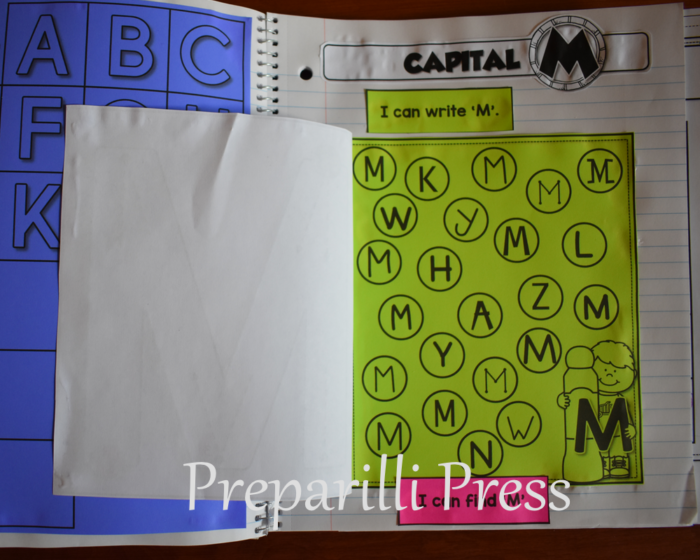
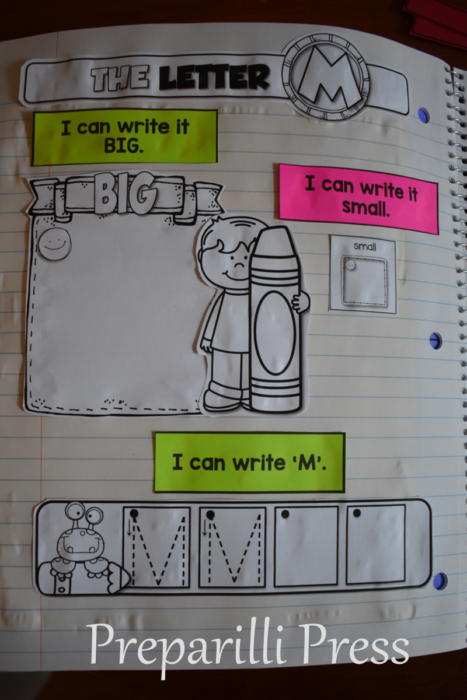
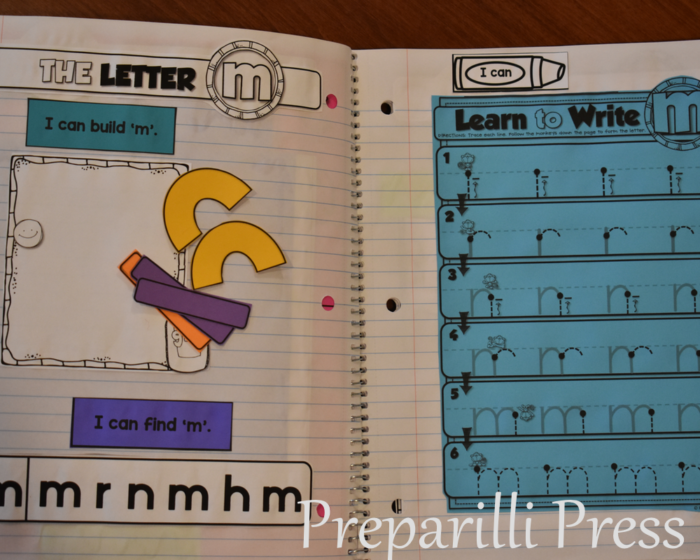
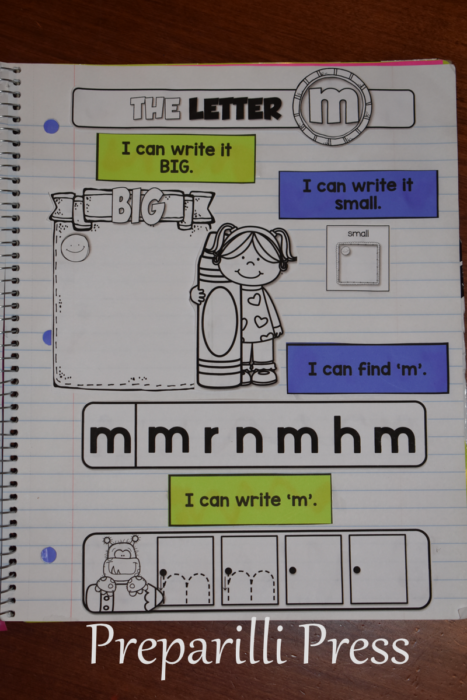
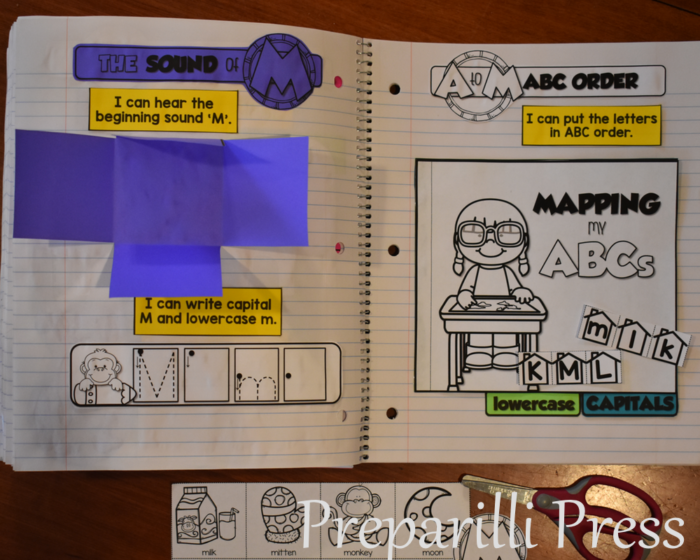
SHEET 2: (pages 6-7 in the pack)To introduce Letter M we will use a Correct Letter Formation flap and a Letter Recognition frame. Here it is ready to use:
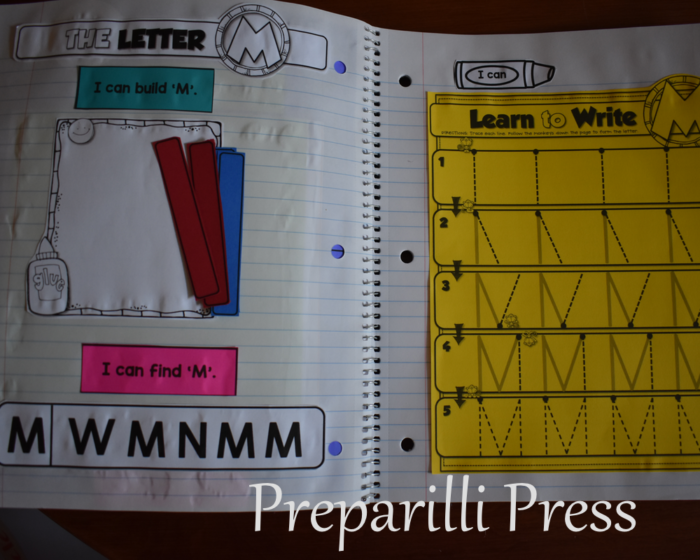
SHEETS 3 and 4: (pages 7-8 in the pack) There are two options for this sheet. We like to practice building the letter, with colored shapes similar to the Handwriting Without Tears wood pieces. Then practice finding the capital again, before we work on correctly writing it. So, our pages look like this:
This set-up includes the Letter M sheet from Step by Step Correct Letter Formation and letter building tiles and the “I can build it” frame (soon to be published). You can also set SHEET 3 up without the extras like this:
The combined set-up above, for students who do not need the extra practice of correctly forming the letter, includes pieces from our SHEET 5:
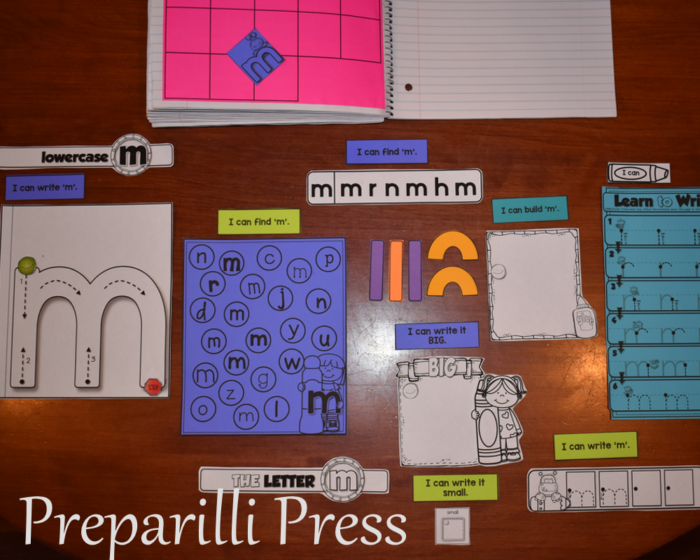
The Capital M section is complete. Lowercase M is a mirror of this section. We’ll use the figure from the TOC and pages 4, 5, and 8-10:
SHEETS 6-10: Here is the notebook ready to use (with the letter building activities included):
The alternative SHEET 8, using only the components from My First Interactive Notebook-Letter M looks like this:
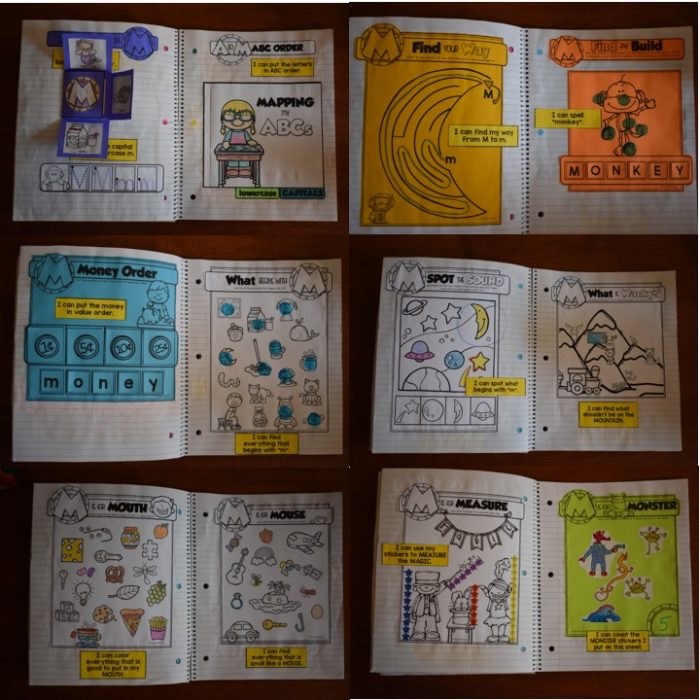
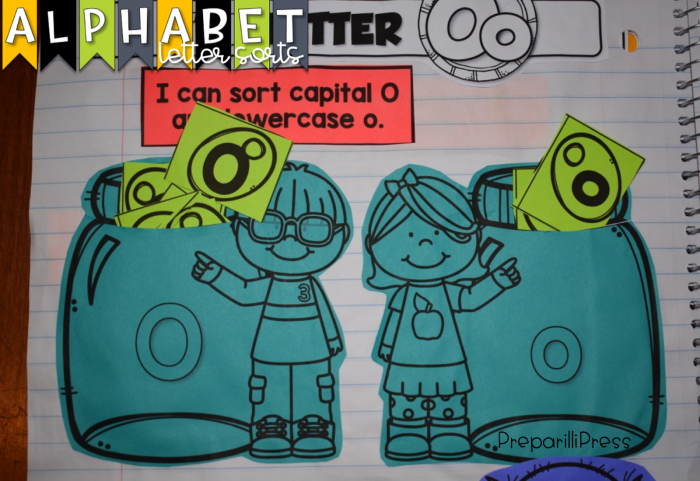
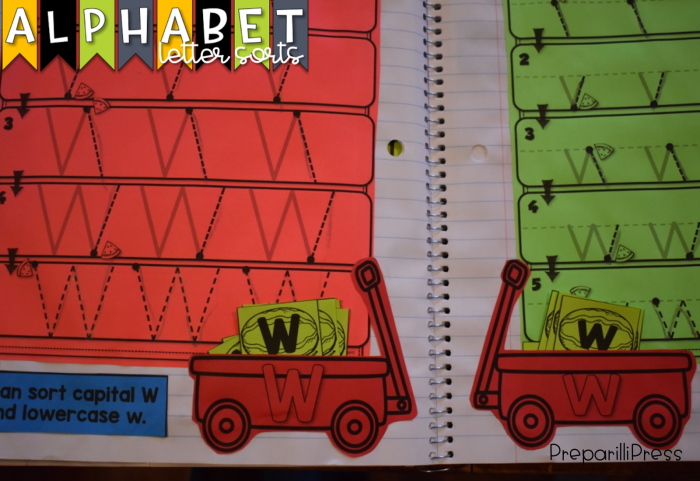
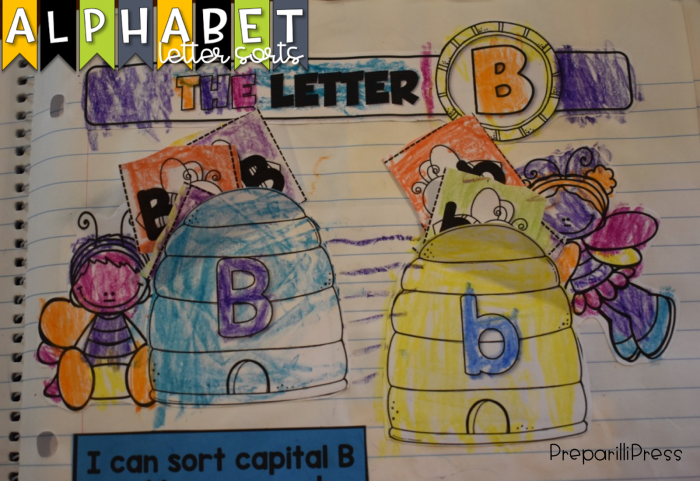
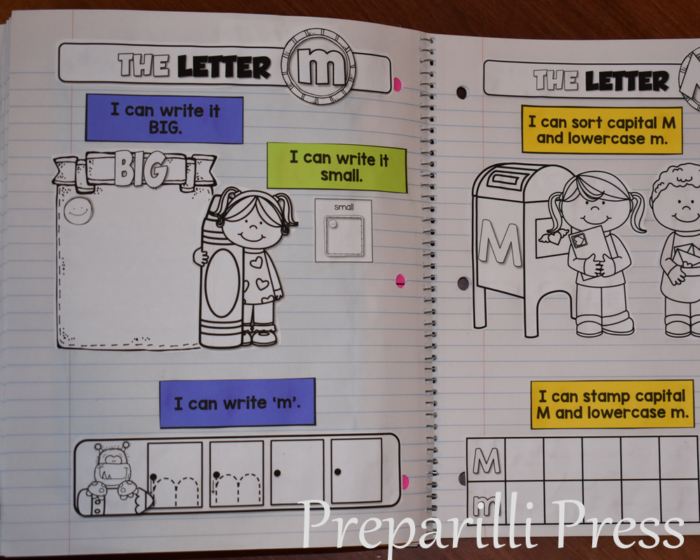
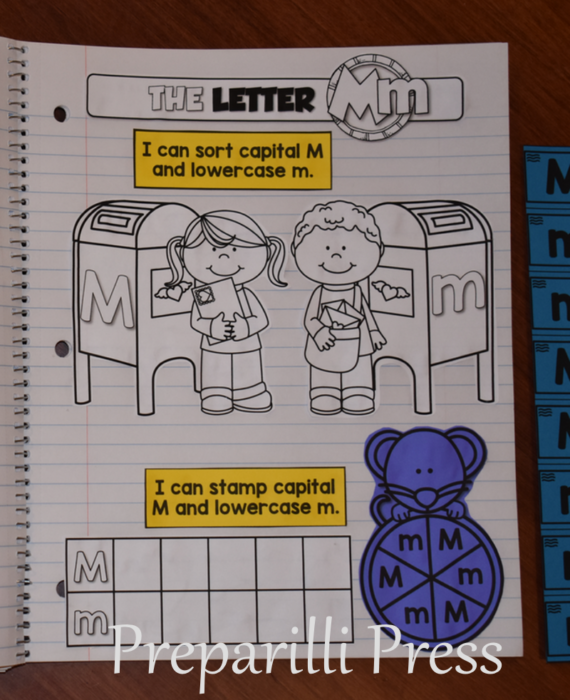
Now for some FUN! On the next sheet your students will compare the capital and lowercase letters by sorting and spinning/stamping them.
SHEET 11: Follow the directions on page 12 to cut out the letter sorting pieces. The Letter Sorting page will be different for each letter (to reinforce the beginning sound each letter makes–for M we chose “mail” and “mailbox”). But, you will always glue the pieces to make a sorting pocket. For this sheet, be sure to cut the top of the mailboxes on the line indicated and glue the top, around the sides, the kidlette, and bottom of the mailbox to your notebook. Do not glue the middle of the mailbox–this is your sorting pocket.
You will also need the “I can” statements for this sheet (page 11) and the spinner (page 13) and stamp frame (page 14). [These are located on different pages so you can alternate colors throughout the your notebook without double-printing individual pages.]
Here is SHEET 11 ready to use:
SHEET 12: Now we’ll work on the SOUND of M. Cut the petal book and header from page 13 and the remaining pieces from page 14 (plus the I CAN statements associated with these tasks from page 11). Your students should color the beginning sound pictures before cutting and pasting them. The petal book is easy to assemble. Simply fold inward along the dotted lines, until it looks like a square (or square-ish :). Glue the back of the petal book into your notebook.
Your page will look like this:
SHEET 13: (see above) This is our ABC Order sheet (pages 15-17, plus the I CAN statement from page 11 and the letter houses from page 8). Use color, or white paper, for the ABC Orders–I like to vary it from letter to letter.
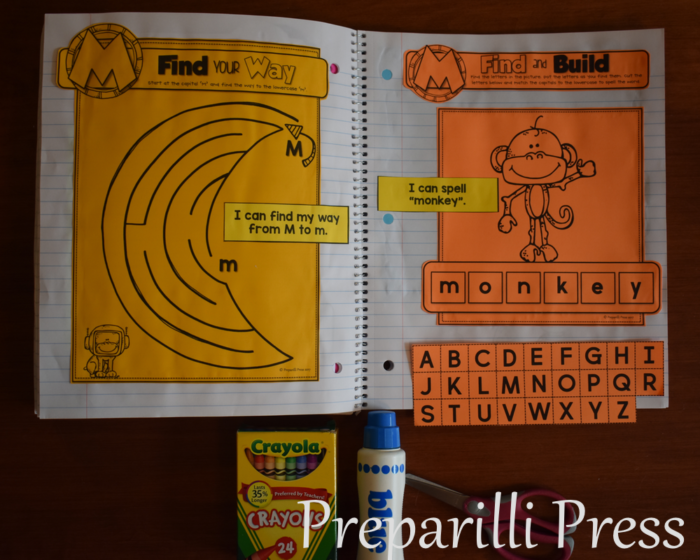
Just like the Letter Sorting, the ABC Order will be specific to the letter you are working on. For Letter M we chose “map.” Additionally, the ABC Order will only include letters that precede the target letter–so this week we are reviewing A-M. Your students will only need to put the last 3 letters in order each week. If you’d like these sheets with all the letters A-M for your students to sort, you can find them here (coming soon!).
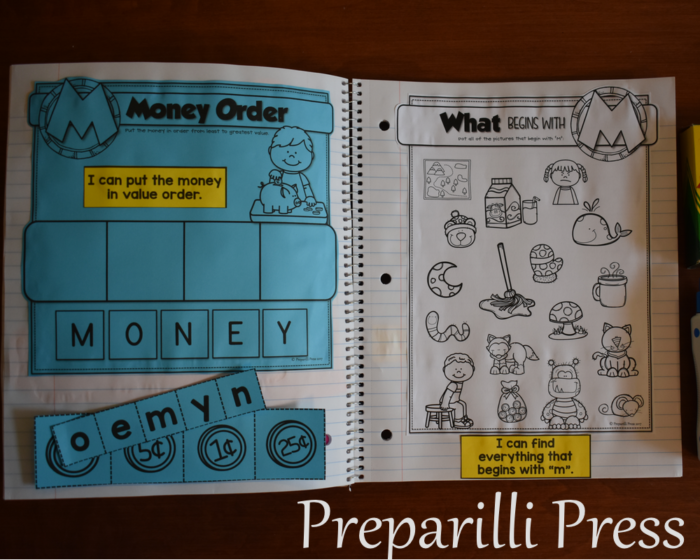
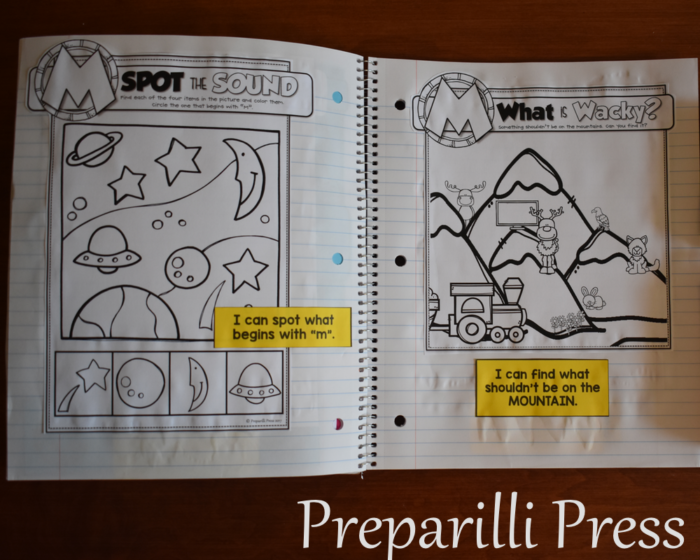
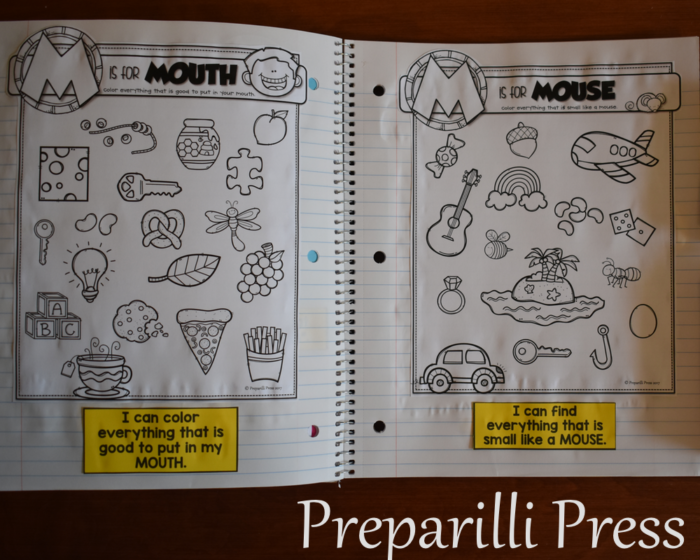
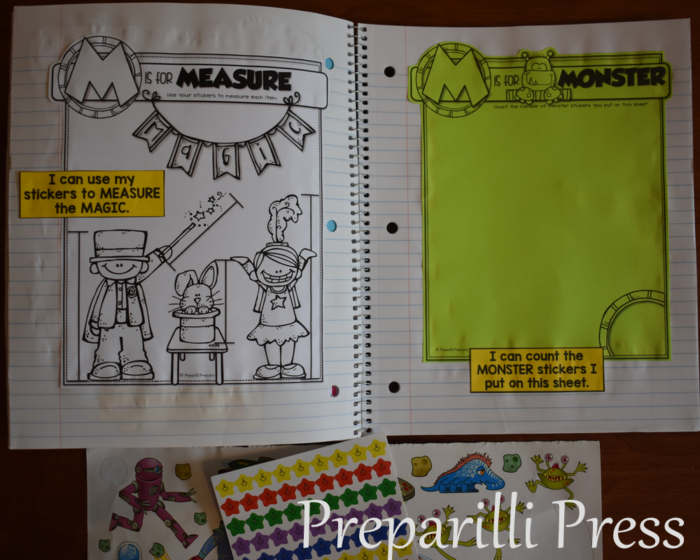
SHEETS 14-23: (pages 18-27) This section requires very little prep on your part. Most sheets will require you to simply trim the excess white space around the activity frame. The Find and Build sheet (page 19) and Order/Sequence sheet (page 20) are the only ones that will require you to cut out other pieces. It is also up to you what order you have your students complete this section. Here is how we set ours up:
These last two sheets we will use stickers to complete the activities.
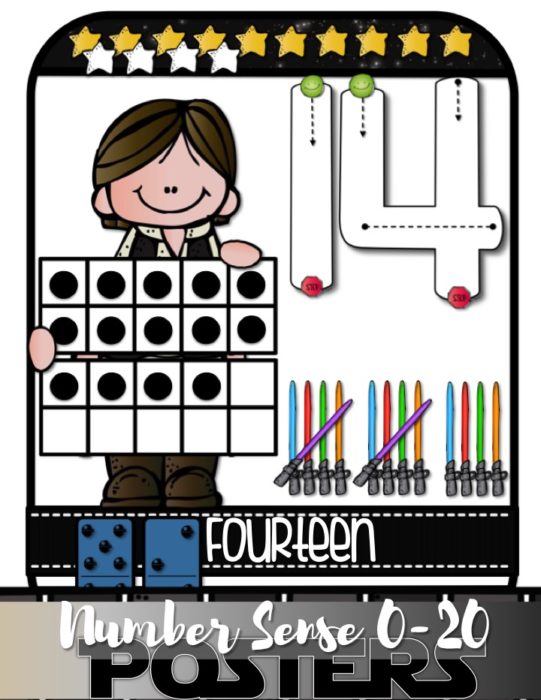
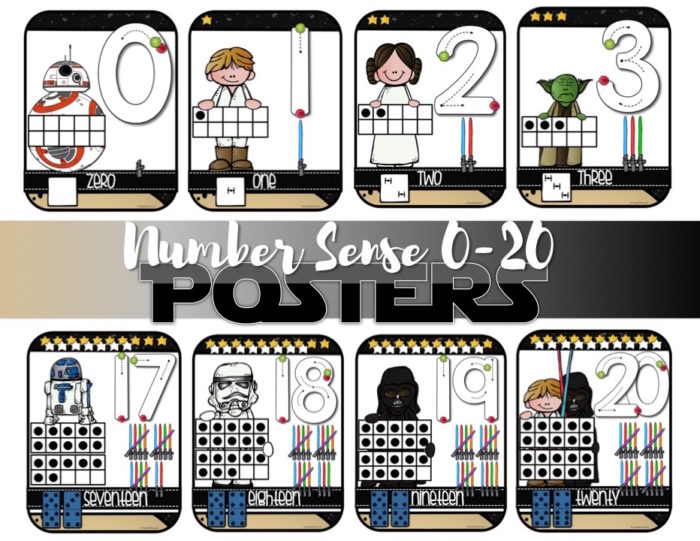
Half-price today and tomorrow! These posters are perfect for teaching number sense and correct number formation to your youngest padawans.
Each Star Wars Anchor Chart includes:
* Correct Number Formation
* Number Word
*Melonheadz Star Wars Character 10 or 20-Frame
* Counting Stars
* Lightsaber Tally-marks
* Tie Fighter Dice (for numbers 0-10)
* Death Star Dominoes (for numbers 11-20)
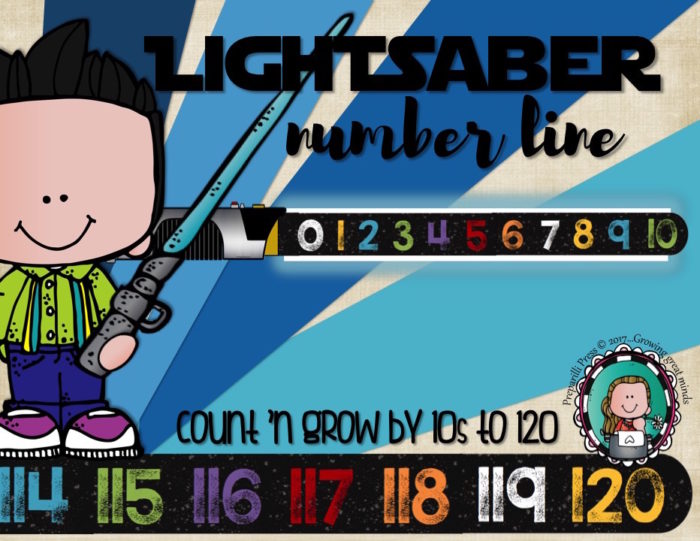
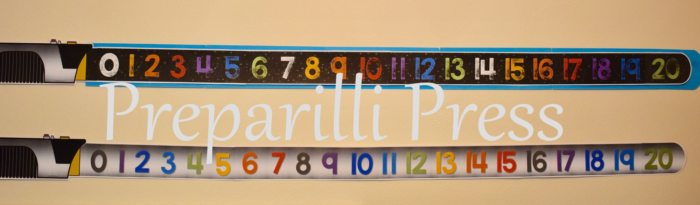
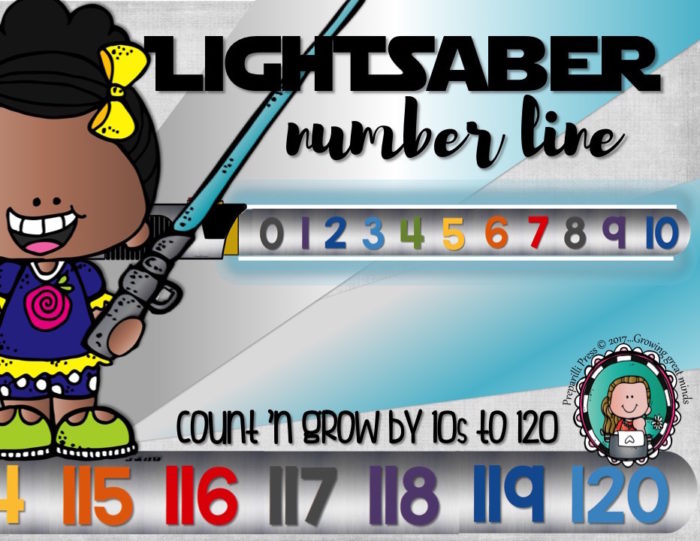
The perfect addition to your Star Wars-themed classroom—a lightsaber number line! These come in Black Galaxy and Silver. They are 3″ tall (the hilt is 4″ tall by 13.5″ long). You can add your favorite paper behind the blade for a “glowing” effect.
These number lines can grow as your students practice and master each group of tens. A lightsaber tip for each of the 10s is included in the set.


 All of the activities in this pack include mats and booklets WITH prompts, for your newest number learners or students that need additional practice, and WITHOUT prompts (so you can assess your students’ learning).
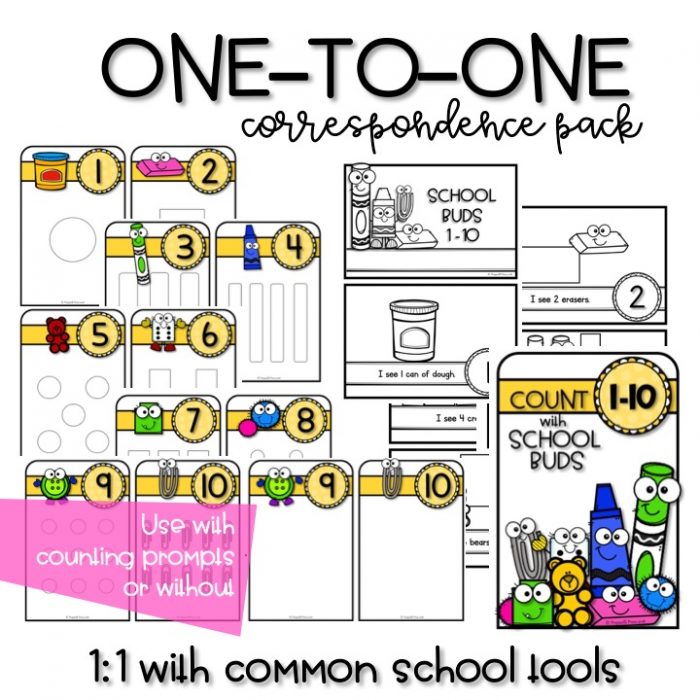
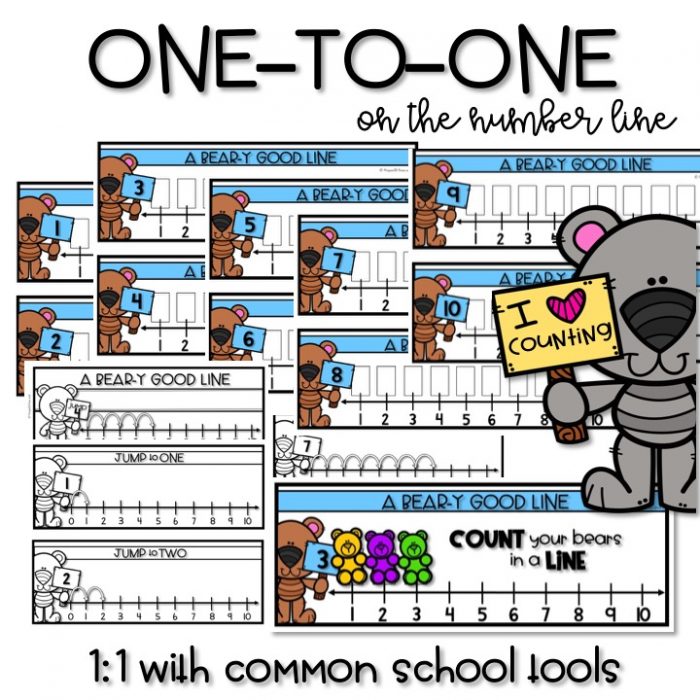 Finally, teach 1:1 correspondence using a Bear-y Good Line (and counting bears).
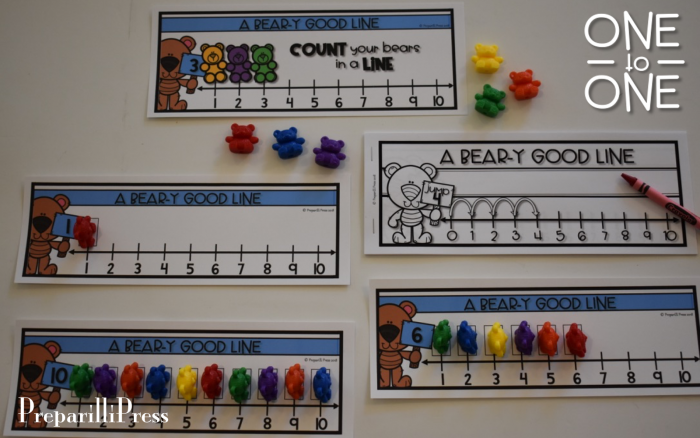

 Actually, we ended up with 3 notebooks filled with A to Z work! They are going to be such a GREAT starting point for kindergarten. I know you will love using them with your students!

 These last two sheets we will use stickers to complete the activities.